Loading store
Loading store
WishlistStore FinderGift Cards

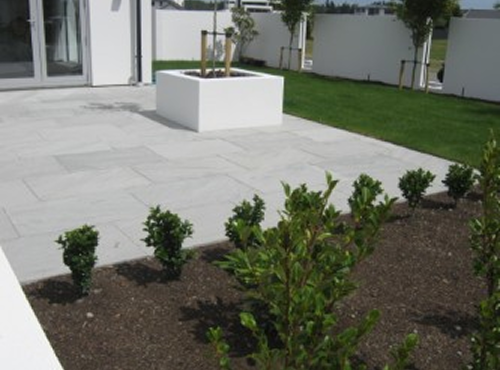
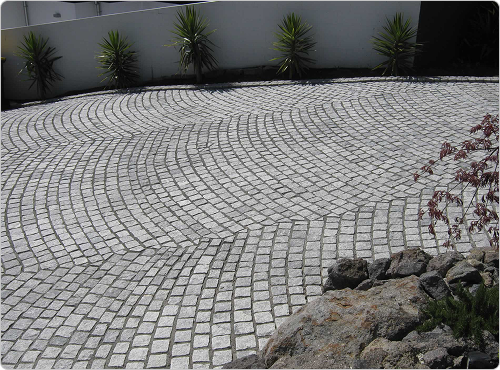
How to lay Urban Paving Natural Pavers

Urban Paving Natural Pavers are made from high-quality natural stone such as granite, bluestone, or Indian sandstone. These pavers are cut and finished to bring natural character and timeless style to patios, paths, courtyards, and other outdoor living areas. When installed correctly, natural stone pavers deliver both long-lasting durability and a beautiful finish that suits New Zealand’s changing conditions. This guide covers everything you need to prepare, lay, finish, and maintain your natural stone paving project.

What you’ll need

Before you begin, make sure you’ve got everything ready.

Materials:

  • Urban Paving Natural Pavers (mix from multiple pallets for colour consistency)

  • Sub-base material (GAP40 or GAP65 if soil is weak)

  • Basecourse material (GAP20 aggregate)

  • Bedding material (sand or 5:1 sand and cement mortar)

  • Jointing material (grout or polymeric jointing sand)

  • Edge restraints (plastic, metal, or concrete kerb)

  • Geotextile fabric (optional, for poor drainage)

  • Clean water

  • Sealer (optional)

Tools:

  • Tape measure and pencil

  • Pegs and string lines

  • Spirit level

  • Spade and shovel

  • Wheelbarrow and rake

  • Plate compactor

  • Rubber mallet

  • Trowel and rake

  • Wet saw or masonry saw

  • Stiff broom and soft broom

  • PPE (gloves, safety glasses, hearing protection, dust mask

Before you start

Professional guidance

For large or complex projects, Urban Paving recommends consulting an engineer or landscape architect to ensure your design meets NZS 3116:2002 paving standards and local council requirements.

Plan your slope and drainage

A fall of at least 10 mm per metre (1 percent) should be built into the surface to allow water to drain away. If drainage is poor, consider a thicker sub-base or installing a subsurface drain.

Pro tip icon
Pro tip: Proper drainage protects against efflorescence and colour fading caused by moisture build-up.

Check your subgrade strength

Subgrade strength affects how thick your base needs to be. You can estimate strength by walking on damp soil:

  • Weak soil leaves a deep footprint (CBR 4)
  • Medium soil compresses under your heel (CBR 7)
  • Strong soil leaves no mark (CBR 15)
If your soil is soft, add a GAP40 sub-base for stability.

Step-by-step laying instructions

  1. Site clearing and excavation
    Remove grass, roots, and debris. Excavate deep enough to include your total layer build-up: basecourse, bedding layer, and paver thickness.
    • Patios and paths: around 150 mm total depth
    • Driveways: 200 mm total depth
    Compact the subgrade with a plate compactor and shape it to follow your planned fall.
  2. Sub-base (if required)
    Spread a layer of GAP40 or GAP65 aggregate if the soil is weak or poorly draining. Compact it in layers no thicker than 75 mm until firm.
  3. Basecourse
    Spread GAP20 aggregate evenly across the area and compact each layer thoroughly.
 Typical compacted thicknesses:
    • Weak soil (CBR 4): 100 mm
    • Medium soil (CBR 7): 75 mm
    • Strong soil (CBR 15): 50 mm
    Ensure the finished base is level and follows your fall.
  4. Bedding layer
    Urban Paving recommends a 30 mm bedding layer of sand or mortar. Sand bedding:
    • Use clean, sharp washed sand.
    • Spread evenly and screed to 30 mm after compaction.
    • Compact gently and level the surface.
    Mortar bedding:
    • Mix 5 parts sand to 1 part cement.
    • Spread a 30 mm layer of mortar on the compacted base.
    • Trowel smooth and level.
    • Work in small areas so the mortar does not dry before placing the pavers.
  5. Pro tip icon
    Pro tip: For best results, always use a fully supported mortar bed for 20 mm natural stone. It gives a stronger bond and reduces movement over time.
  6. Laying the pavers
    Start from a straight edge or a corner. Use string lines to guide your layout.
    • Place each paver gently on the mortar bed or sand.
    • Maintain consistent joints of 8–15 mm.
    • Tap down lightly with a rubber mallet until level.
    • Check level and alignment regularly.
    For natural variation in colour and texture, mix pavers from different pallets as you go.
  7. Pro tip icon
    Pro tip: If using mortar, apply a bonding agent such as Cemkey Concentrate to the back of each paver to improve adhesion.
  8. Cutting
    Use a wet saw or masonry saw to cut edge pavers to fit. Always wear safety gear and clean the surface after cutting to avoid staining.
  9. Filling the joints
    Once the pavers are laid, fill all joints with Grout or fine dry sand. Sand jointing:
    1. Sweep fine, dry jointing sand into the gaps.
    2. Compact the pavers with a plate compactor fitted with a rubber mat.
    3. Top up and repeat until joints remain full.
    4. Sweep off any excess.
    Polymeric jointing sand:
    1. Sweep into joints and lightly mist with water to activate.
    2. Creates a firm, weed-resistant finish.
    Grout jointing:
    1. Mix grout to manufacturer instructions.
    2. Apply using a rubber float or squeegee at a 45-degree angle.
    3. Wipe off excess immediately with a damp sponge.
    4. Allow to cure before walking on the surface.
  10. Pro tip icon
    Pro tip: Grout joints provide a more durable, water-resistant finish ideal for permanent or high-end applications.
  11. Finishing touches
    Install edge restraints around the perimeter to prevent movement. Clean the surface to remove any sand or grout residue. Check levels and ensure the area is even before sealing or using.

Sealing your pavers

Sealing helps protect natural stone from stains and enhances colour while keeping moisture out.

When to seal:
Wait two to three weeks after installation so moisture from the bedding layer can evaporate.

How to seal

  1. Make sure the pavers are clean and completely dry.
  2. Apply a penetrating, breathable sealer using a roller or sprayer.
  3. Let the first coat dry completely before applying a second coat.
  4. Avoid water contact for 24 hours.
Urban Paving recommends using Dry Treat Stainproof or Dry Treat 40SK (for saltwater pool areas).
Pro tip icon
Pro tip: Always use a sealer that allows the stone to breathe. Avoid solvent-based topical sealers.

Maintenance and care

Cleaning
Sweep regularly to remove dirt and debris. Wash with water and a stiff broom when needed. For deeper cleaning, use a water blaster on low pressure.
Never use hydrochloric acid or harsh chemicals, as they can damage the stone.

Stain prevention
Because natural stone is porous, wipe away spills immediately to prevent staining.

Efflorescence
White powder may appear as salts rise to the surface. This will fade naturally with rain or gentle washing.

Frost and drainage
Ensure the paved area is well-drained to avoid water pooling beneath pavers. Good drainage reduces frost damage and prolongs the life of the paving.

Long-term maintenance
Reseal every few years depending on use and exposure. Clear grout or mortar residue early to avoid difficulty cleaning later.
Inspect for cracks or movement and repair as needed.

Pro tip icon
Pro tip: Efflorescence (a white chalky deposit) can occur naturally as concrete cures. It usually fades with weathering and washing but can be treated with an efflorescence remover if needed.

Note: Product instructions shown here are provided for guidance only and may not reflect current advice. Please refer to the manufacturer’s documentation for most up to date instructions.

Download the supplier’s full guide

For complete technical details, you can view or download the official installation PDF.

Download full PDF guide

Feinwerk concrete pavers

Feinwerk

Concrete Pavers

Firth Concrete Pavers

Firth

Concrete Pavers

Viblock Concrete Pavers

Viblock

Concrete Pavers

Premier Italia Concrete Pavers

Premier

Italia Concrete Pavers

Premier Lifestyle Concrete Pavers

Premier

Lifestyle Concrete Pavers

Urban Paving Concrete Pavers

Urban Paving

Concrete Pavers

Urban Paving Natural Pavers

Urban Paving

Natural Pavers

Urban Paving Porcelain Pavers

Urban Paving

Porcelain Pavers

Urban Paving Natural Cobblestones

Urban Paving

Natural Cobblestones