Loading store
Loading store
WishlistStore FinderGift Cards

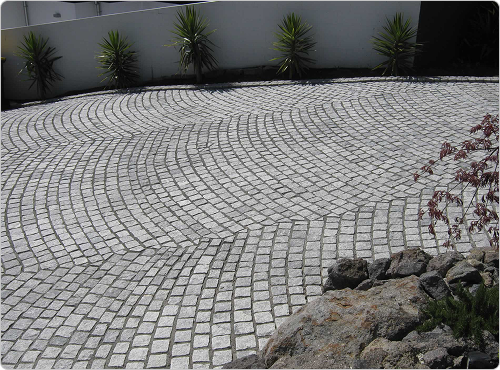
How to lay Urban Paving Natural Cobblestones

Urban Paving Natural Cobblestones are hand-cut granite stones known for their durability and timeless look. These cobbles are ideal for paths, light traffic areas, courtyards, and feature areas that require a hard-wearing surface. This guide follows Urban Paving’s official installation standards and outlines each stage clearly so you can achieve a strong, professional finish.

What you’ll need

Before you begin, make sure you’ve got everything ready.

Materials:

  • Urban Paving Natural Cobblestones (mix from multiple pallets for consistent colour)

  • GAP40 or GAP65 sub-base aggregate

  • Basecourse (GAP20, compacted according to subgrade strength)

  • Bedding sand or mortar (30 mm thick)

  • Jointing material (sand or grout, depending on your installation)

  • Edge restraints (plastic, metal, or concrete kerb)

  • Clean water

  • Sealer (optional)

  • Geotextile fabric (optional for poor drainage areas)

Tools:

  • Tape measure and pencil

  • Pegs and string lines

  • Spirit level

  • Spade and shovel

  • Wheelbarrow and rake

  • Plate compactor

  • Screeding board (100 x 25 mm and about 2 m long)

  • Trowel and rake

  • Screeding rails (25–30 mm diameter)

  • Block splitter or diamond wet saw

  • Stiff broom and soft broom

  • PPE (gloves, safety glasses, hearing protection, dust mask

Before you start

Plan your layout and fall

Always plan for water drainage. Create a slope of at least 1 percent (10 mm per metre) away from buildings and low spots.

Check subgrade strength

Urban Paving recommends following NZS 3116:2002 for proper base design. Weak soils may need additional sub-base depth or drainage improvements. A solid, well-compacted base will ensure your cobblestones remain even and stable for years.
You can test soil firmness by walking on dampened soil:

  • Soft soil leaves a clear footprint
  • Medium soil compresses under your heel
  • Firm soil leaves little or no mark
For larger projects, a Scala Penetrometer Test can confirm strength values.

Step-by-step laying instructions

  1. Site clearing and excavation
    Remove all grass, roots, and topsoil. Excavate deep enough to accommodate all layers, sub-base, basecourse, bedding layer, and cobblestones.
    • Paths and patios: around 150 mm total depth
    • Driveways or heavier loads: 200–250 mm total depth
    Shape the base to your planned slope and ensure no areas will trap water.
  2. Sub-base and basecourse preparation
    If the soil is soft or has poor drainage, spread a GAP40 or GAP65 sub-base layer. Compact it firmly to create a solid foundation. Next, install the basecourse (GAP20) in layers no thicker than 75 mm. Compact each layer until firm using a plate compactor. Lightly moisten the material to help it bind together.
    Basecourse depth depends on your subgrade strength:
    • Weak soil (CBR 4): 100–180 mm
    • Medium soil (CBR 7): 75–125 mm
    • Strong soil (CBR 15): 50–75 mm
  3. Bedding layer
    Cobblestones can be laid on either sand or mortar, depending on your finish preference.
    Sand bedding:
    • Spread sand loosely and screed to 30 mm thick after compaction.
    • Check the surface using a straight edge. Adjust if needed before laying cobbles.
    • Compact a small section, check level, then continue across the area.
    Mortar bedding:
    • Mix 1 part cement to 5 parts sand with enough water to hold shape when squeezed.
    • Spread evenly to 25–30 mm thick.
    • Work in small areas so the mortar does not dry before you can lay the cobbles.
  4. Pro tip icon
    Pro tip: If your project includes driveways or slopes, use mortar bedding for greater strength and reduced movement.
  5. Laying the cobblestones
    Begin at a corner or fixed edge. Set up string lines to guide straight, even rows. Lay each cobblestone by hand and tap gently with a rubber mallet. Maintain a consistent joint width as specified for your jointing type, wider joints (10–15 mm) suit grout, while tighter joints (5–8 mm) are suitable for sand. Check level and alignment every few rows. The cobbles’ natural variation in size adds character but should still form an even, safe surface.
  6. Jointing

    Sand jointing:
    • Sweep fine, dry jointing sand into all gaps.
    • Compact the cobbles gently using a plate compactor with a rubber mat.
    • Top up sand after compaction and repeat until joints are full.
    • Sweep off any excess sand.
    Grout jointing:
    • Prepare grout according to the manufacturer’s directions.
    • Apply using a squeegee or rubber float, pushing grout firmly into the joints.
    • Work in small areas and clean any excess grout immediately with a damp sponge.
    • Allow to dry completely before traffic resumes.
  7. Pro tip icon
    Pro tip: Use polymeric jointing sand to help resist weeds and washout. Activate with a light mist of water if required by the product instructions.
  8. Finishing touches
    Use a wet saw to cut cobbles neatly along edges, curves, or obstacles. Always wear safety gear. Install edge restraints along the borders to lock the surface in place. Check that edges are secure and sit level with surrounding ground. Sweep the surface clean and inspect for even joints or areas that may need topping up.
  9. Sealing your cobblestones

    Sealing natural cobblestones helps protect against stains, dirt, and moisture while highlighting the natural colour and texture of the granite.

    When to seal:
    Wait two to three weeks after installation to ensure the bedding and joints are completely dry.

    How to seal

    1. Clean the cobbles thoroughly to remove dust, sand, and residue.
    2. Apply a penetrating, vapour-permeable sealer evenly using a roller or sprayer.
    3. Let the first coat dry before applying a second light coat if recommended.
    4. Avoid water contact and traffic for 24 hours.
    Reapply every three to five years depending on traffic and exposure. High-traffic areas may need more frequent reapplication.
    Pro tip icon
    Pro tip: Always test the sealer on a small hidden section first to confirm the desired finish.

Maintenance and care

Regular cleaning
Sweep the cobblestones often to remove dust and debris. For deeper cleaning, scrub with water and a mild detergent using a stiff brush.
 A water blaster can be used at low pressure but keep the nozzle at least 300 mm from the surface to prevent joint damage. Avoid strong acids or harsh cleaners that could damage the stone’s natural surface.

Stain prevention and removal
Clean spills immediately. For oil or food stains, use a neutral pH cleaner made for natural stone. Avoid bleach or solvents that can discolour the stone.

Joint maintenance
Over time, jointing sand may wash away. Top up as needed to prevent movement and weed growth. If you used grout, check for cracks and repair as needed.

Weed and moss control
Apply a weed inhibitor after installation or use polymeric sand to prevent growth. In shady areas, moss can be removed with a mild cleaner and scrubbing.

Frost and weather
Ensure good drainage to avoid frost damage. After winter, check for lifted or uneven cobbles and reset them if necessary.

Resealing and long-term protection
Reapply sealer every few years to maintain appearance and durability. In high-traffic areas, inspect for chips or cracks and repair promptly to prevent spreading damage.


Pro tip icon
Pro tip: Efflorescence (a white chalky deposit) can occur naturally as concrete cures. It usually fades with weathering and washing but can be treated with an efflorescence remover if needed.

Note: Product instructions shown here are provided for guidance only and may not reflect current advice. Please refer to the manufacturer’s documentation for most up to date instructions.

Download the supplier’s full guide

For complete technical details, you can view or download the official installation PDF.

Download full PDF guide

Feinwerk concrete pavers

Feinwerk

Concrete Pavers

Firth Concrete Pavers

Firth

Concrete Pavers

Viblock Concrete Pavers

Viblock

Concrete Pavers

Premier Italia Concrete Pavers

Premier

Italia Concrete Pavers

Premier Lifestyle Concrete Pavers

Premier

Lifestyle Concrete Pavers

Urban Paving Concrete Pavers

Urban Paving

Concrete Pavers

Urban Paving Natural Pavers

Urban Paving

Natural Pavers

Urban Paving Porcelain Pavers

Urban Paving

Porcelain Pavers

Urban Paving Natural Cobblestones

Urban Paving

Natural Cobblestones