The average New Zealand house build generates between four and five skip bins of construction and demolition waste.
Unfortunately, lots of brand new and unused building products end up in these skips, too - full rolls of building paper, unopened tubes of silicone, or boxes of unused nails, screws, and plates. It’s not great. But by sorting your waste streams, you can be part of the solution.
The basics
The main reason valuable building materials end up in landfill is because they’re simply cleared into a skip as part of a site clean-up when there is no clear area or storage location for these materials.
Waste-sorting is more straightforward than you might think. It’s just means having separate bins for each material type, instead of throwing it all in one skip together. This increases the likelihood of them being reusable or recyclable.
Plus, landfill fees are expensive, and they’ll keep increasing, so the less you send to the tip the better for your back pocket.
Sorting waste streams on site helps:
- avoid contamination
- save space and money
- reduce the environmental impact of construction and demolition waste
Putting it into practice
Decide what you’re sorting
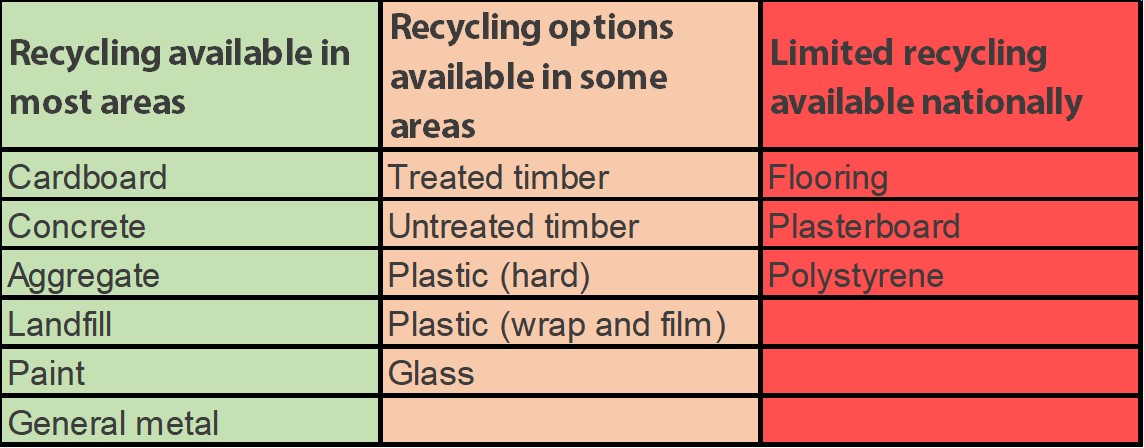
Some of the materials you can sort are listed below, from most widely available processing to the less widely available. We suggest starting with the green ones first, as these are easiest, then adding the others as you and your team become more comfortable with the process.
Key:
- Green = recycling available in most areas
- Orange = recycling options available in some areas
- Red = limited recycling available nationally
Keep a tidy site
Make sure you keep a tidy, well-organised site, ensuring there’s a place for everything and everything has its place. This will prevent materials from getting damaged or misplaced, while also increasing site safety and productivity.
Have designated, centralised cutting areas
Designated cutting or preparation areas for timber, joinery, cladding, and tiling minimises handling and walking on site, so off-cuts end up in a single location for easy sorting and/or reuse.
Your team and contractors are also more likely to reuse off-cuts (and reduce your waste) if they are stored separately – no clambering through a skip bin to get that 600mm piece of 2x4.
Waste-sorting area
There are some key things to keep in mind when setting up a waste sorting area.
- Work with your waste providers to find out what types of materials can be recycled locally, and how do they need to be stored for easy collection and processing? There’s no point in sorting materials which no-one can recycle or reuse.
- Use clear and standard signs with pictures - download A3 signs or A4 signs
- Set maximum sizes for materials to encourage reuse
- Locate bins near the work area
How to sort plastic waste
Sorting is the key to being able to either return your plastic waste streams to the supplier or recycle them.
- First, identify your plastic waste streams - common ones include soft plastics, polypropylene (#5), polystyrene (EPS), pipes, and food/drink packaging (usually #1 & #2)

Figure 1 This pie chart shows average proportions of the types of plastic waste generated on building sites
- Then, check if your supplier will take your plastic waste back
- Find local recyclers/transport options
- Set up a recycling area with signs and bags
- Train your staff to use the signs to identify plastic, sort it, make sure it’s reasonably clean and not mixed up with dirt, tape, food, etc
Some Mitre 10 suppliers have circular programmes you can use such as:
Mitre 10 has circular programmes for household items too:


Free resources
- Download A4 bin signage to use on your site
- Download A3 bin signage to use on your site
- Sustainability Awareness Board
- Sustainability Zero Waste Board
Case studies
- Case Studies from Auckland council
- Case Study skip-dive-waste-audit-huapai-2023-10.pdf
- Case study: Naylor Love - Diverting construction waste | Construction Accord
- Case Study Benton construction The end of the skip and a 568,935-tonne problem for NZ?, All things property, under OneRoof
- Naylor Love case study – waste reduction at Tauhara
- Wastebusters Dunlop Builders case study – residential
Extra for experts
- The Detail: Tonnes of construction waste an 'invisible' problem with the house building ramp up | Stuff
- What materials can be recycled? | BRANZ
- New Plymouth District Council has produced a useful guide, including a volume-to-weight conversion calculator